How To: Make an AC Arc Welder Using Parts from an Old Microwave, Part 1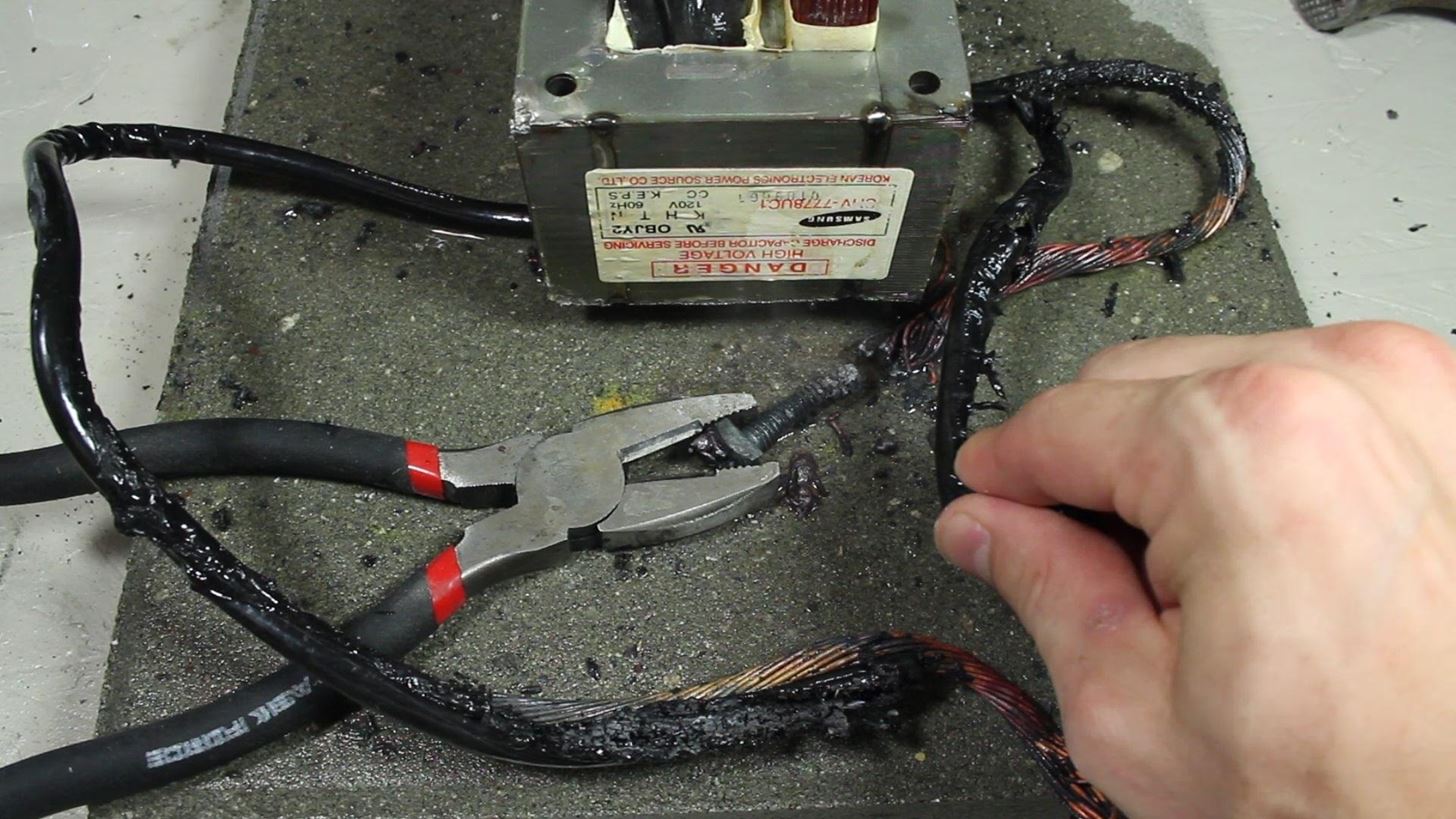
In a previous article, I demonstrated an Arc Welder made using parts from old microwave ovens. Please enable JavaScript to watch this video.
Here is part 1 of 2 on how that arc welding machine was made, and how you could make one too! This is the first of two parts on building it, focusing on the modification of the transformers. Please enable JavaScript to watch this video.
WARNING: Stick welding, and/or the modification of a Microwave Oven Transformer (M.O.T), can be very dangerous and presents risks of UV radiation, shock hazards, burns, fires, fumes and a multitude of other risks. This project should not be attempted without a thorough understanding of electricity, adult supervision and adequate training. Misuse, or careless use, of tools or projects may result in serious injury and/or death. Use of this content is at your own risk. In a previous project, I melted the lead wires on my first metal melter. But the transformer core was still in great condition, so I re-used it to make an AC stick welder!The arc welder made sparks fly, but in the end, it wasn't enough power to make the metal stick, and the pieces of work would break apart with very little effort.If I tried pumping more power into the welder, the wires would overheat and melt.So to address this challenge, we'll be using 2 MOTs (Microwave Oven Transformers), because more transformers means more power! Preparing the MOTs for a new secondary is exactly the same as the first few steps we took in the Metal Melter project. As it's a little redundant, I won't spend much time on the step-by-step instructions for that, but if you haven't seen it yet, you can check out the video, or reference my previous article. To make life a lot easier, you're going to need to build a little jig for winding your secondary. It's unlikely you'll get all the required turns of wire in such a tight space without one.To make this jig, I used a piece of scrap wood and cut it so that it was as wide as the center of the transformer, and just a little shorter than the top. The length was cut so that it overhung about 1/2" from the ends.I screwed wood panels on the top and bottom to guide the wires and keep them in place, then folded a piece of paper so that it fit in the groove.Once mounted in a bench vice for leverage, the cable can be wound on.For this project, try to round up around 50'of 8 AWG stranded copper cable from a local hardware store. You could probably save some money by scavenging for free wire, but I decided to look at the "end of coil" section at the hardware store, and was able to negotiate a deal for half price on the cable, so the 50' only cost me about $17.These modified MOTs will need a new secondary that is 18 turns of the 8 AWG cable, and both MOTs will be tied together in series. I also found I needed to run the system on 240 volts AC to get the power output for good welding. My goal was 30+ volts AC with a variable amperage from 0-120+ Amps.In practical terms, this means you need to wind the coil on the form so that you end up with 6 cable lengths high, and 3 cable lengths wide. Oh yeah, and it all needs to be able to fit back in the transformer, so wind it tight!The first layer isn't too bad, but winding the second layer, and third get progressively more difficult, and may seem near impossible.Once you get the 18 turns of wire to fit in the groove, you can fold the paper over, and tape it together to help the coil hold together.Here's the tricky part .. get it off the jig without letting it unravel!The top and bottom panels can be removed, and the block pushed out from the center of the coil. I used electrical tape to make sure the coils stayed tight. Putting the secondary coil in the transformer is a very tight fit.I had the best success by using a set of clamps to squeeze the sides of the coil in, while I used a rubber hammer to gently tap the coil down.When it's in, the coil had better fit below the top edge of the transformer, otherwise you won't be able to get the top back on.Securing the top on is the same as in the Metal Melter project as well. Basically, use 2 part epoxy glue to cover the entire top surface, then replace the iron lid and press it together tightly in clamps or a large vice.It's extremely important to have a lot of pressure on the joint while the epoxy is setting. I let mine set for about 24 hours.The modified transformer is complete! The secondary coil is so tight in there, that any vibrations from the 60Hz mains power will be kept to a minimum. When both transformers are modified in the exact same way, we've basically got what we need for welding. All that's left is to clean it up a bit and make it more useful and presentable. By the way, these two exposed wires from the secondaries will become our ground clip and stinger.Well, there they are! The basic makings of an AC stick welder. From this point, it isn't difficult to finish the system up into a nice little hobby welder. Watch how to do that in Part 2. Please enable JavaScript to watch this video.
If you haven't see the video yet, it's not too late. Watch it here!If you like this project perhaps you'll like some of my others. Check them out at thekingofrandom.com.
This video is unavailable. Watch Queue Queue. Watch Queue Queue
Cut the Rope 10-7 Level 3 STARS Walkthrough GUIDE HD
How To: Theme KitKat to Look Like Android L on Your Nexus 5 How To: Enable Samsung's New Dark Theme on Your Galaxy in Android Pie How To: Hack Your Nexus 7 into a Hybrid Android Tablet That Looks & Feels Like Both iOS & TouchWiz
How to make your home screen look like KitKat -- without the
The GripTight ONE GorillaPod Stand. صورة لـ JOBY / YouTube 3. Selfie Stick . إذا لم تستلم جهاز Telepod متعدد الإمكانات المذكور أعلاه ولكنك ترغب في الحصول على عصا سيلفي لشخص ما ، فستتوفر لديك بعض الخيارات وفقًا لكيفية ظهور النتيجة للمستخدم.
2018 Gift Guide: Must Have Phone Accessories for Movie Lovers
How To: Keep Photos from Hogging Your iPhone's Storage
My Book: http
TextingStory Chat Story Maker on the App Store - iTunes
How to Turn Your Favorite Photo Into Wallpaper. If you've ever visited a place where a wall has been wallpapered with an image, you'll be aware of just how attractive this feature can be when done well.
HOW TO CREATE your own 3D WALLPAPER ANDROID Hindi/Urdu - YouTube
Apple recently released their iOS 12.3 beta 3 to developers and now they have also released the software to their public beta testers. In order to try out the latest beta of iOS 12.3 you will
Apple Releases iOS 12.1.3 Beta 4 to Developers and Public Testers
How To: This Innocent Calculator Is Really a Secret App Safe for Android How To: Secretly Monitor Text Messages on Your Galaxy S4 or Other Android Device How To: Carrier Unlock Your Samsung Galaxy S4 So You Can Use Another SIM Card
Hide All Traces of Your Apps & Pictures on Android - Gadget Hacks
Using a simple workaround, one can change the font settings on the iPhone or iPod Touch to an easier to read, slightly larger size. And the best part? No jailbreaking required!
Change Font size and style in iOS 10 iPhone, iPad, iPod Touch
Taking one-handed pictures with your phone can quickly devolve into a juggling act. You have to secure the phone in landscape mode (if you're doing it right), tap to focus, and then somehow hit the shutter button without shaking the device too much.
How to master the camera on the Samsung Galaxy S7
News: Here's What an iPhone X-Inspired SE 2 Could Look Like
Shop through a wide selection of Carrier Cell Phones at Amazon.com. Free shipping and free returns on eligible items.
How to Root Any Device - XDA-Developers Android Forums
0 comments:
Post a Comment