How To: 1-Click Root Many Android Devices with Kingo Android Root
To Android users, especially advanced ones, rooting their phones or tablets is becoming a necessity. Rooting Android could be complicated, if you do it all by yourself, even with a step-by-step tutorial. However, what Kingo Android Root offers you is a true one-click experience when rooting your Android.
What Is Android Rooting?Android Rooting, in a nutshell, is a modification process to the original system in which the limitations are removed and full-access is allowed, thus resulting in the ability to alter or replace system applications and settings, run specialized apps, and even facilitate the removal and replacement of the device's operating system with a custom one.
What Can You Do After Rooting Your Android?After rooting, you can install a custom ROM and recovery, customize your system with beautiful themes and fonts, increase internal memory by moving all of your apps to an SD card, increase your RAM, overclock and undervolt your device, hack games, remove bloatware, install fantastic root-only apps like Titanium Backup, Greenify, AdAway, and such.
Pros & Cons of Android RootingPros: Basically, the benefits that rooting your Android device can offer are all about acquiring high-level permissions with which you could overcome all limitations and do modifications as you like.Cons: Rooting immediately voids your phone's warranty. Rooting involves the risk of "bricking" your phone.
How to Root Your Android Devices in One Click?Using Kingo Android Root is extremely simple, but I'll elaborate it down to every little detail, so please bear with me.You can see the list of devices that Kingo supports here.The list is incomplete and not up-to-date, it does not necessarily mean not-support if your device is not in the list. If you have any doubt about your device being support, feel free to contact us.
Step 1: Check These PrerequisitesA Windows-based computer with Internet access. USB cable; the original one is recommended. Device powered on with at least 50% battery level.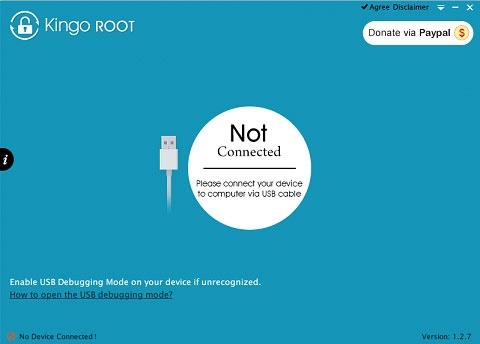
Step 2: Install & Launch KingoKingo Android Root is a free download that is available here. After installing it on your computer, double-click the icon on your desktop to launch it—you will see an interface as shown below.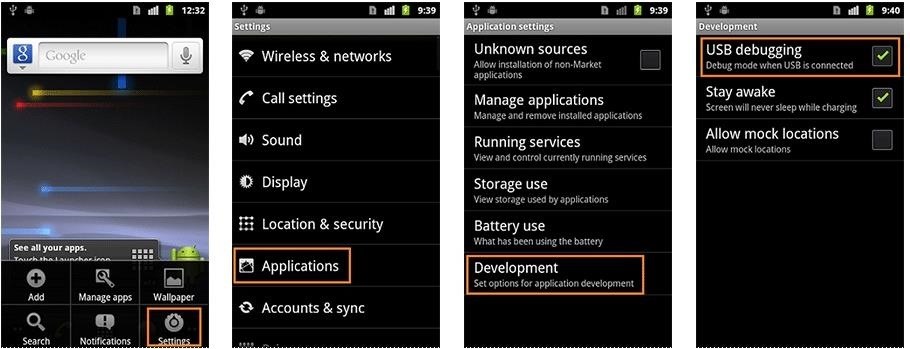
Step 3: Manually Enable USB Debugging Mode on Your AndroidAlthough the very aim of Kingo Android Root is to offer a true one-click rooting experience, this step falls on users. USB debugging mode is a developer option to facilitate a connection between an Android device and a computer with Android SDK (software development kit), which is usually hidden in Android 4.2.X and higher versions.How to Enable USB Debugging Mode on Android?Android 2.0 - 2.3.X Go to Settings -> Applications -> Development -> USB debugging. Android 3.0 - 4.1.X Go to Settings -> Developer Options -> USB debugging. Android 4.2.X and higher, including Android 5.0 Lollipop Go to App Drawer -> Settings -> About Phone -> Build number. Then, tap the Build number 7 times to become developer. Afterward, go to Settings -> Developer options -> USB debugging. More info on how to enable USB debugging mode can be found here.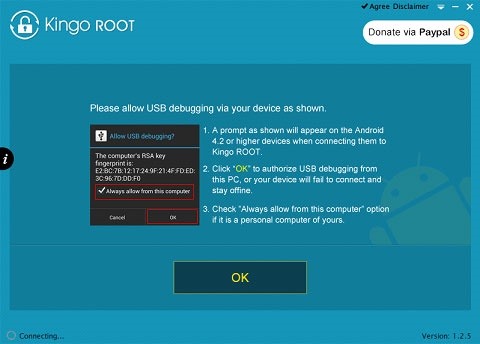
Step 4: Connect Your Android Device to PC via USB CableThere will be a prompt window that appears on your device's screen. Click "OK" to allow USB debugging from your computer. Kingo will automatically install the device driver (if it is not installed already), recognize your device model, and show the root status of your device.
Step 5: Click "ROOT" When You Are Ready to GoPlease read the notifications carefully and be fully aware of its advantages and disadvantages before you proceed. It will take a few minutes for Kingo to run its course.
Step 6: Root Succeeded & Click "Finish" to RebootKingo has rooted millions of Android devices from almost all manufacturers and carriers. The general method that Kingo employs during rooting is an exploit (or vulnerability) of Android firmware.Theoretically, it should not cause data loss, but bad things happen, and Kingo is not responsible for any damage. We will exert every effort to make this software safe and easy to use. As to device support, we are trying to cover every brand and every firmware version, but it is impossible to cover it all, and those vulnerabilities we rely on to root your device will be patched by authorities in later firmware.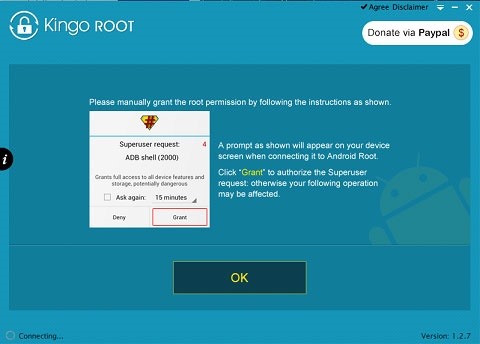
Kingo Android Root Also Has "Remove Root Function" Built-InKingo has built-in "Remove Root" function as well. Connect your device to your computer via your USB cable and grant "Superuser Request" for an ADB shell on your device. After your device is recognized by Kingo, you should see your Root Status as "YES" with the "Remove Root" button on the interface. Just click it and wait.
About KingoappOfficial website: www.kingoapp.comEmail: support@kingoapp.comFollow us on Facebook: Kingoapp
How To: Install the Xposed Framework on Your Nexus 7 for Insane Customization How To : Easily Access Your Camera from the Lock Screen on Your Samsung Galaxy Note 2 How To : Remove the Carrier Name from Your Lock Screen in Android Lollipop
How to Install the Xposed Framework on Your HTC One for Super
This Is by Far the Easiest Way to Set Up a Free VPN on Your
Conclusion. We hope that you liked this article and that you were successful in the making of your TV antenna or Outdoor TV antenna.If you did like it, do share the article with others, those who might want to know how to make a TV antenna.
How to Make a Homemade TV Antenna | Techwalla.com
How to Set Swiping to Delete or Archive Gmail on iPhone
Step 1: Add Additional Emails for FaceTime & Messages. Before we get the ball rolling, it's important to note that you can't add additional iCloud accounts, as doing so will yield an "Invalid" result upon entering, so only email accounts not linked to Apple and iCloud can be added on. That said, open the Settings app to get started.
Hack Receive Kids Chat History on Imessage - Spy on My
stellest.com/hack-receive-kids-chat-history-on-imessage
Hack Receive Kids Chat History on Imessage - Spy on My Boyfriend's or Husband's Cell Location - Découvrez l'univers de Stellest - Art énergie renouvelable - Art solaire - Trans nature art - Artiste Stellest énergie renouvelable - Art cosmique - Nature Art stellest - Tête Solaire Stellest - Stellest
Remove additional icloud mail accounts - Apple Community
How To: Install the Leaked KitKat Build on the Samsung Galaxy Note 2 (International Variant Only) News: The Best Black Friday 2018 Deals on Android Phones News: Samsung May Have Jumped on the Dual Camera Bandwagon for the Galaxy Note 8 How To: KitKat Leaked! How to Install the Latest Android 4.4.2 Build on Your AT&T Samsung Galaxy Note 3
Cortana for Android Has Leaked & Here's How to Install It
Ever stumbled upon a cool boot animation on a friend's Android device or a presentation on the Web? It isn't hard to make your own. In fact, we are going to show you in this post, two ways to create a custom boot animation for your own device. Recommended Reading: 30 Must-Try Apps For Rooted
Galaxy Gear with LG G watch bootanimation - YouTube
How To: The Flashlight That Finally Lets You Adjust LED Brightness on Your Samsung Galaxy Note 2 How To: The Fastest Way to Access the Notification Tray in Full-Screen Apps on Your Samsung Galaxy S3 How To: Turn On Night Shift Mode in iOS 11 on Your iPhone
Fix Slow Auto Brightness Adjustments on Any Samsung Galaxy
Try toggling Contacts in iCloud on and then off again to fix it. Here's how to do that. Step 1: Launch the Settings app on your iPhone and then tap on iCloud. For users who use iOS 11 and later versions (including iOS 12), they can find iCloud by going to Settings > Your User Name > iCloud. Step 2: Find "Contacts" and turn it "ON" if it is "OFF."
Contacts Disappeared from Your iPhone? Here's How to Bring
A Guide on How to Find Your Phone's Screen Density Value (320 DPI, 480 DPI, 640 DPI, Etc.) By Pearl Sahni updated November 9, 2017 The Android devices are increasing their population all over the world at a very fast speed.
How to Find Your Phone Screen Density Value (320 DPI, 480 DPI
How To: 20 Tips to Help You Master Gboard for iPhone Quick Tip: Speed Up Gboard Performance on Android by Disabling These Two Settings News: This Is the Best Swype Alternative for iPhone & Android How To: Unlock & Use the Morse Code Keyboard in Gboard on Your iPhone or Android Phone
Tip: Speed Up Gboard Performance on Android by Disabling
0 comments:
Post a Comment