How To: Everything to Do When You Get a New Phone
After setting up your phone, there are a number of things you should do immediately before download your favorite apps. Specifically, now that your data is on the device, you need to take steps now to ensure it's both protected and retained. Fortunately, most of these steps are a one-time process.The reason this should be done with your new device is that oftentimes, we will ignore the protection and retention of our data until it is too late. By making these modifications now, you can be sure that for the entire life of your new phone, your data will be both private and accessible by you.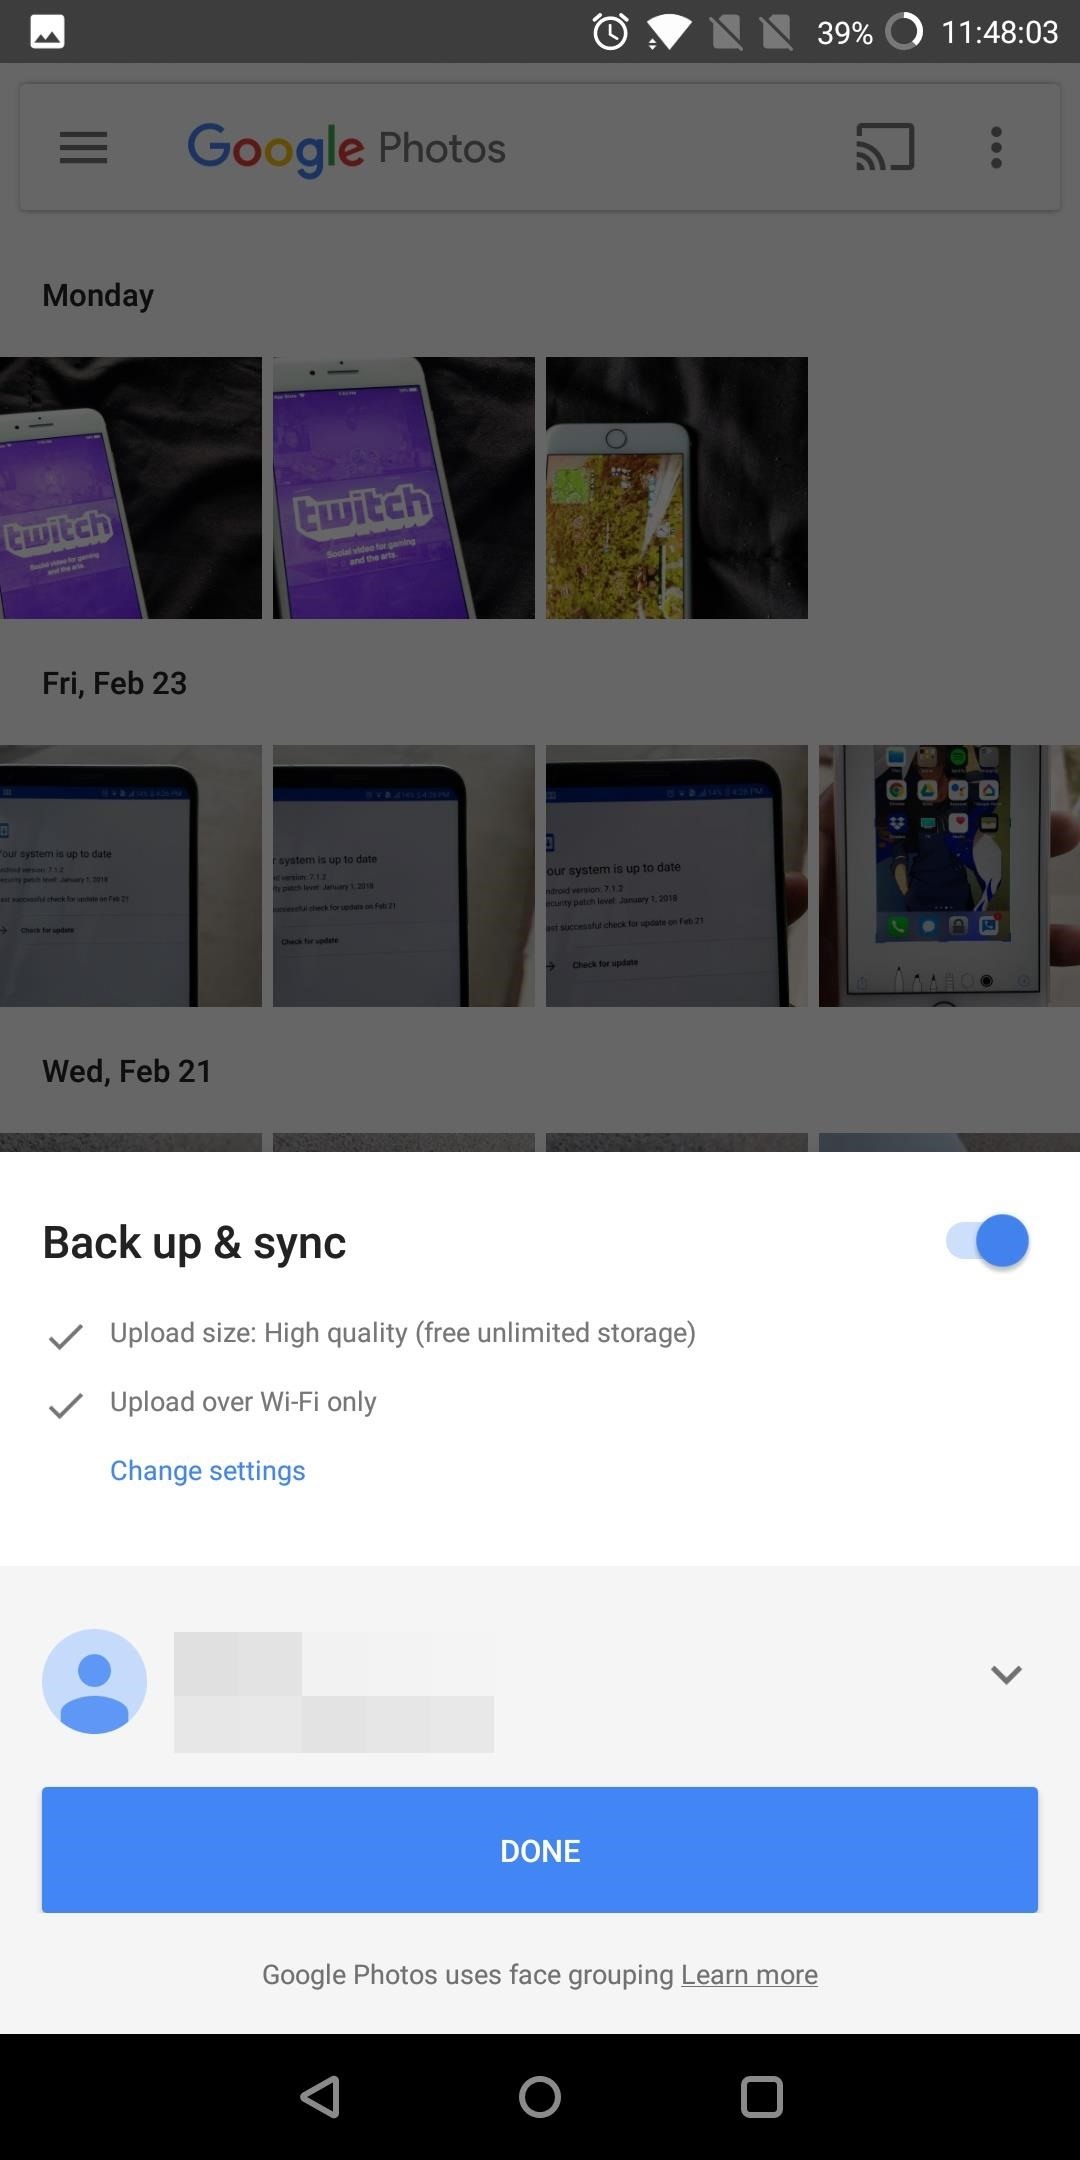
Step 1: Back Up Your Photos & VideosThe first thing any new phone users should do is set up automatic backup of their data. While 99% of the time you may never use it, it takes only one to make you regret not having it. Google automatically backs up a lot of your data (unless you specifically disable the feature during setup), but it doesn't back up everything. Specifically, your photos, videos, and your text messages.For photos and videos, Google does provide an app to automate the process, but it isn't enabled by default. Google Photos will automatically back up any files located in the Camera's main folder (which means any image or video taken with your camera). To enable this, just open up Google Photos and select "Done" on the initial prompt. The default settings will only back up your media when you're on Wi-Fi, but if you have an unlimited cellular data plan, you may want to enable cellular data backup so that your media is backed up immediately. To do that, head to the side menu and choose "Settings." Select "Back up & sync" and enable the toggle for Photos and Videos under the Cellular data backup grouping.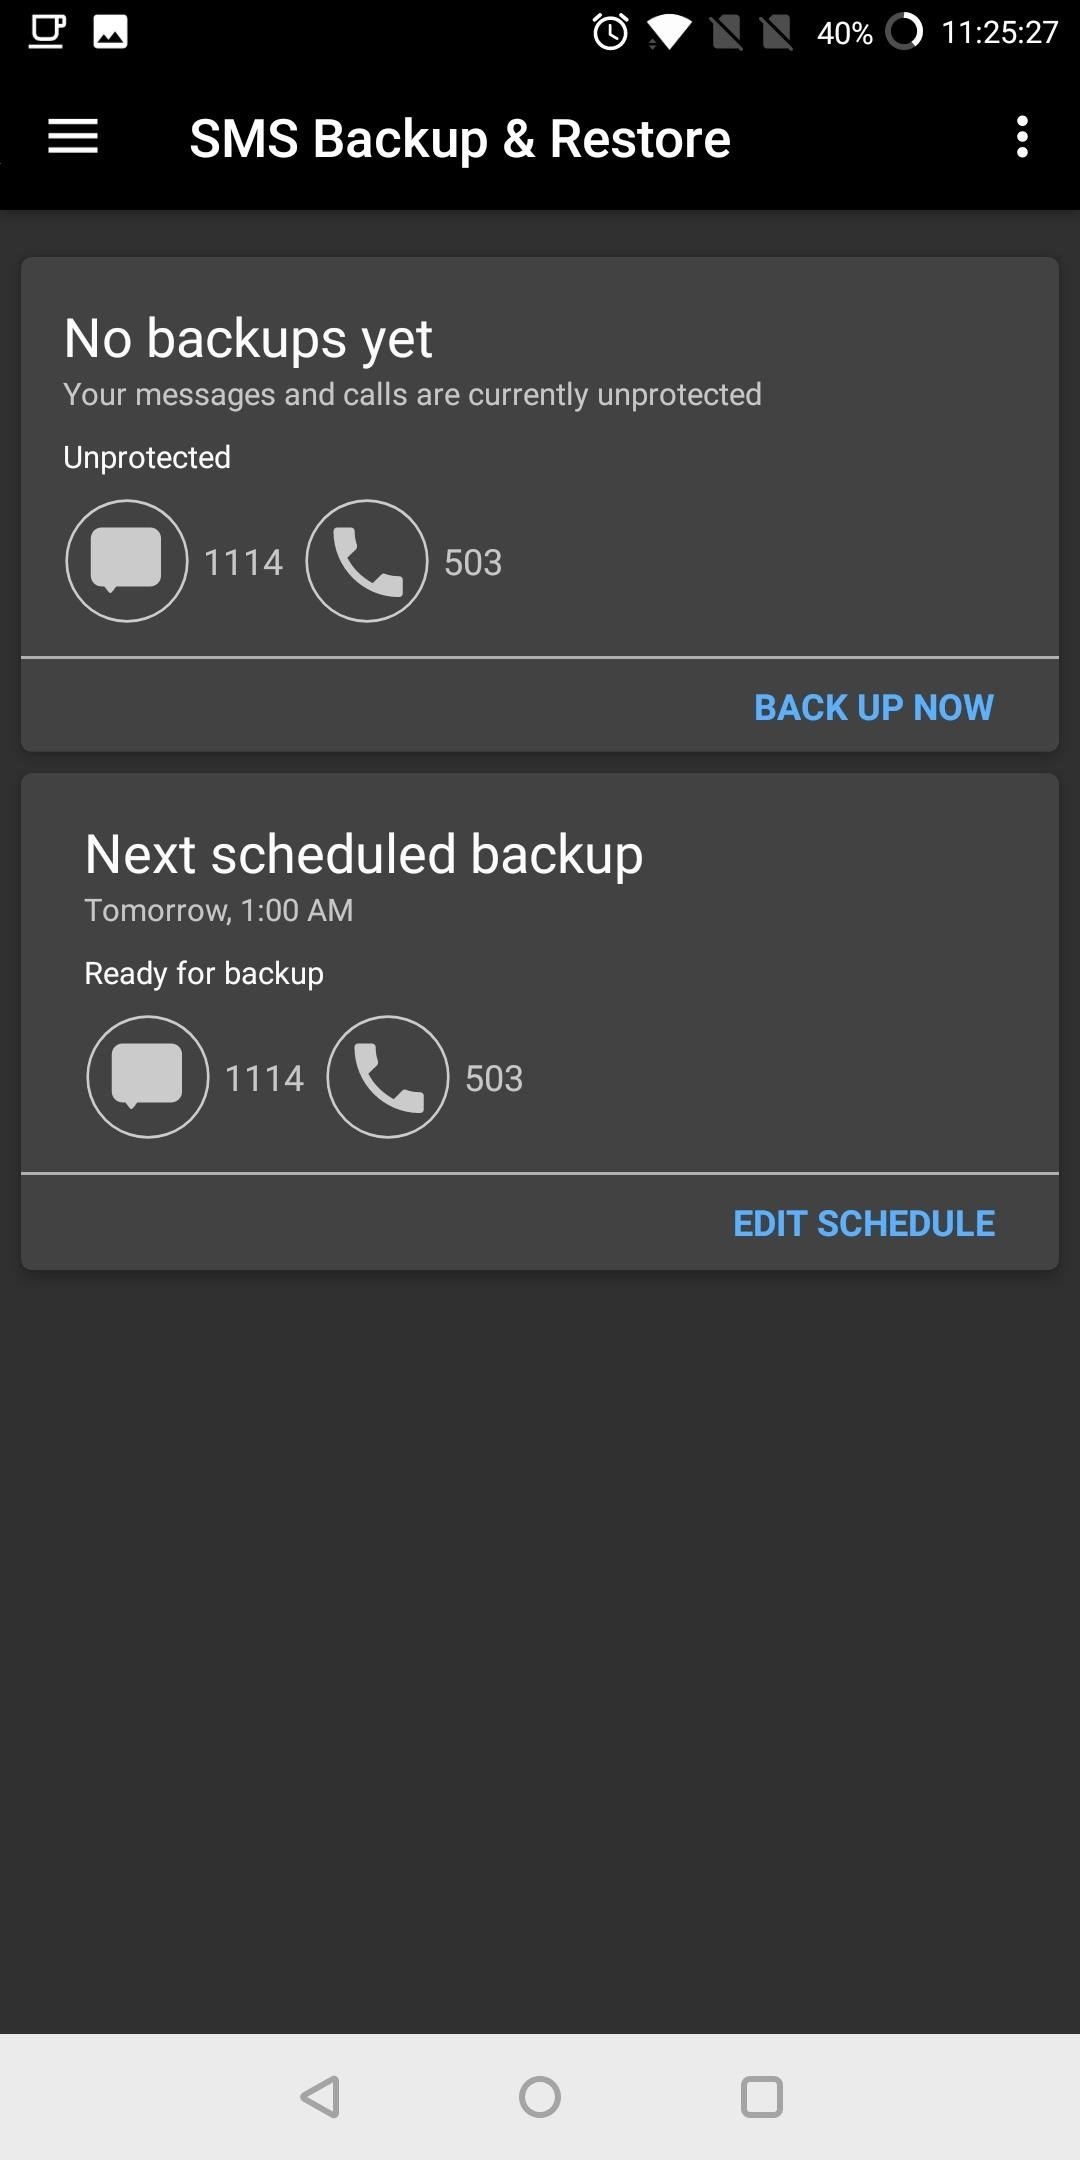
Step 2: Schedule Backups for SMS, MMS & Call HistoryAnother aspect of your data which isn't backed up automatically by Google is your SMS (and MMS) messages and your call history. In order to back these up, you will need the assistance of a third-party app.With SMS Backup & Restore, you can automatically back up your text messages, pictures messages, and your call history. To schedule your first backup, select "Edit Schedule" on the main page. Choose whether you want daily, weekly, or even hourly backups. For the daily and weekly options, the default time will be 1:00 am. Once you chose the frequency, tap "Save." By default, the backup location will be your Google Drive. This is a great option because your data is safe even if your phone becomes compromised. For example, if you lose your phone or if you need to factory reset your phone, local copies are no good as the data is tied to your phone. But with cloud storage, as soon as your sign in, you'll have immediate access to your data again.
Step 3: Disable Location HistoryNow that your data is properly backed up, you'll want to keep your data private. There are a number of default settings enabled that sacrifice your privacy which should to be disabled. One of these options is Location History.Location History keeps a log of your location to provide you personalize ads based on your whereabouts and provide GPS directions to your saved locations (such as your home or workplace). That may be fine for some users, but if you're a privacy-minded individual, you can see how to disable it at the link below.Don't Miss: How to Turn Off Location History on Your Android Device
Step 4: Stop Personalized AdsEvery Android device has something known as an advertising ID which is used to identify your device as you browse the web and use apps. Using this data, Google serves up ads that are specifically targeted at you. You can instructs apps not to use this advertising ID by opting out the program.Besides the advertising ID, Google collects data from a variety of sources, including Chrome and YouTube. It is recommended that you turn off these collections to keep your data private. You can read how to disable all of these options at the following link.Don't Miss: How to Opt Out of Google's Data Collection on Android
Step 5: Review App PermissionsWhether you started your device clean or imported your app information from a previous phone, an important step for any new phone user is to review app permissions. Apps on the Play Store have been known to enable a multitude of permissions that aren't necessary for functionality. Because of the severity of the misuse of this information, this should be done both when first setting up your device and periodically to ensure any new apps aren't stealing your data.Don't Miss: How to Review App Permissions on Android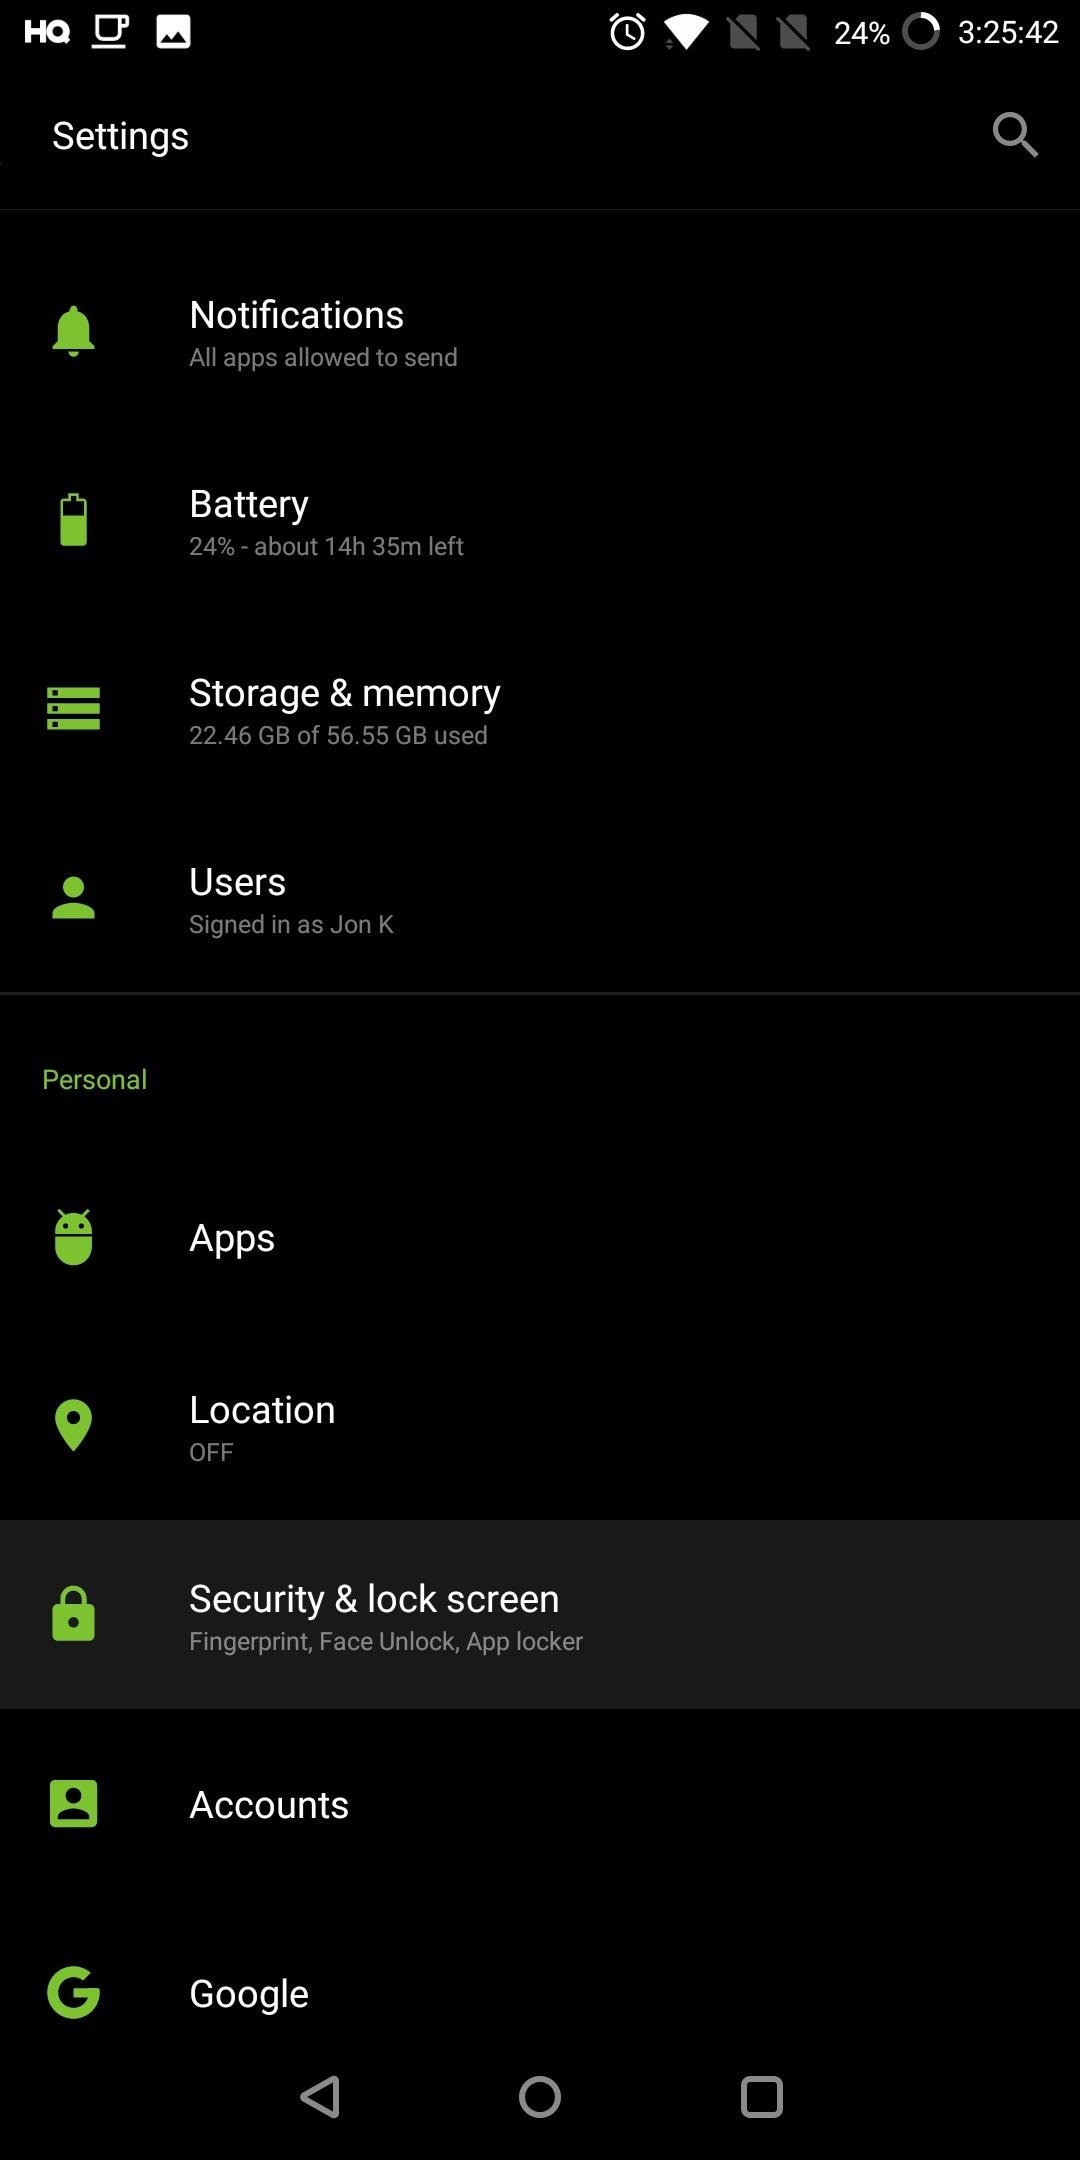
Step 6: Secure Your Lock ScreenWhen you initially set up your device, Google suggests that you protect your lock screen by enabling one of the many authentication methods. Whether it's biometrics or a password, PIN, or pattern, you should have enabled one of them to keep your device safe.Besides offering anti-theft protection, a lock screen can protect unauthorized individuals from accessing your data as they need to know the authentication method. However, sometimes new users forgo the lock screen, opting for either no lock screen or a swipe up gesture. If this was you, follow these steps to enable an actual lock screen.Enter Settings and select "Security & lock screen" or some other variation of those words (depends on the skin used by your device). Select "Screen Lock" and choose any method besides "Swipe" or "None." Follow the instructions to add this security layer to your device. For the fingerprint scanner, find the "Add fingerprint" option and follow the instructions to scan your fingerprint.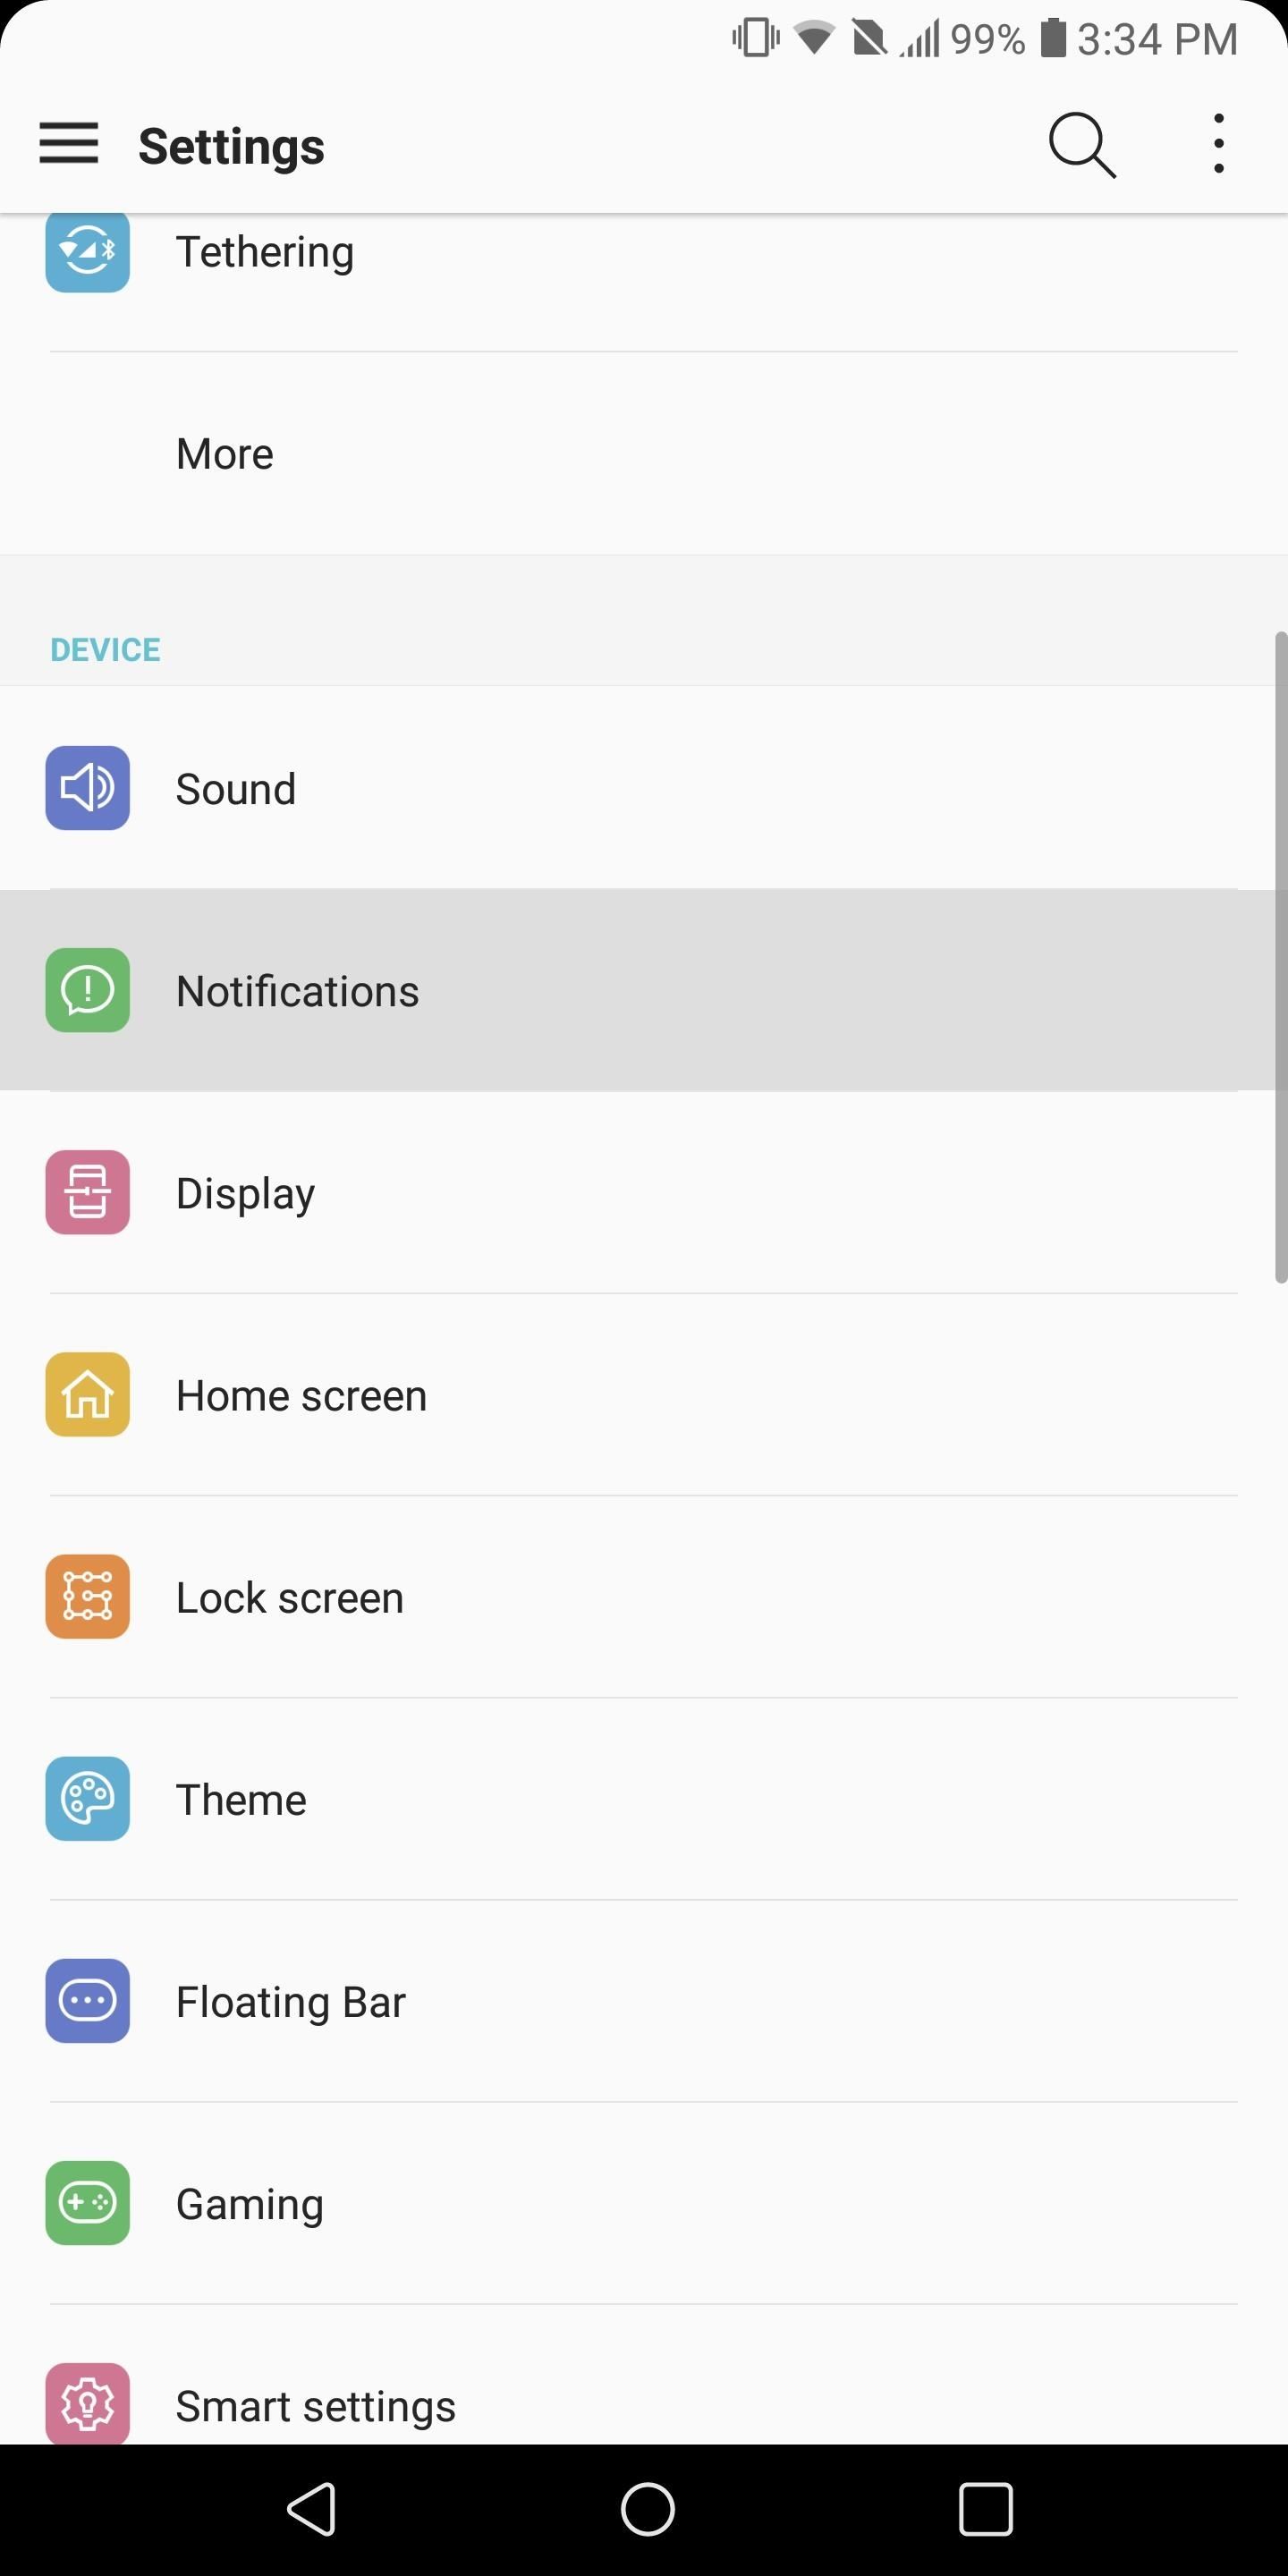
Step 7: Limit How Notifications Are DisplayedOne of the conveniences of Android's lock screen is the ability to read and manage notifications without unlocking your device. Unfortunately, this also leaves us vulnerable to someone else using that same convenience to read our notifications without having to unlock our device. Therefore, we recommend changing the default notification settings.To do so, open Settings and select "Notifications" (or whatever variation is used by your OEM skin). Under the "Lock screen" option (this may be hidden behind a sub-menu which you can access using an icon in the upper-right corner of your display), choose "Hide sensitive only." With this enabled, notifications from apps such as messaging will alert you of a new notification, but won't display the message unless you unlock your phone. After using these suggestions, your data will be both private and recoverable. By doing this immediately, you reduce the risk of losing your data and protect yourself in the event that Google ever became compromised. There are also more security steps you can take which we highlight in our Android Security 101 Collection. Check out the link below for information, and let us know in the comments below if you found these tips helpful!Don't Miss: Android Security Tips & Tricks for BeginnersFollow Gadget Hacks on Facebook, Twitter, YouTube, and Flipboard Follow WonderHowTo on Facebook, Twitter, Pinterest, and Flipboard
Cover image and screenshots by Jon Knight/Gadget Hacks
A new app on the Play Store — Nexus 5 Real Volume Booster — does exactly that and allows Nexus 5 owners to increase the speaker as well as the headphone volume output of the device. Sadly, the app requires root access to work properly. Read the steps below to find out how you can use the app to improve the volume output of your Nexus 5
How to Boost the Volume of Your Nexus 7 - Laptop Mag
Galaxy S10 lock screen can help you keep your data from prying eyes. Samsung also allows you to tweak and customize the Galaxy S10 lock screen to match your personal preferences and needs. This Galaxy S10 how-to guide explains the components of the Galaxy S1o lock screen, shows you how to customize the lock screen, […]
How to Watch 2 Videos Simultaneously on Your Galaxy Note 9
Just released and available today for developers. Android Lollipop for Nexus 5. Get #AndroidLollipop now with my easy step by step tutorial! IMPORTANT: This update will restore your device. BACKUP
How To Install Android 5.0 Lollipop On Your Nexus Player
The New Stagefright Exploit called METAPHOR and it is created by ISRAEL security researchers. The researchers have also provided a proof-of-concept video demonstration that shows how they successfully hacked an Android Nexus 5, samsung galaxy S5, LG G3 & HTC ONE device using their Metaphor exploit in just 10 seconds.
New Exploit to 'Hack Android Phones Remotely' threatens
Rooting your Android device will allow you to customize its software, extend its battery life, boost its memory, and install apps exclusive to rooted devices. You can root your Android 2.3.6 Gingerbread device using Kingo for Windows, or using One Click Root software for Windows or Mac OS X.
Download Gingerbreak APK File - Root Android
rootandroid.net/download-gingerbreak-apk-file-gingerbread/
By Root Android - July 13, 2011 7:45 AM. Gingerbreak - The new tool we can opt for to root Android 2.3 Gingerbread. Gingerbreak was developed and out forward by XDA Developers Forum member Chainfire and all credit goes to him for bringing this wonderful one click rooting tool.
Best Android Games 2019. by John Corpuz May 6, 2019, Best Android Puzzle & Word Games Page 10: Best All 11 Mortal Kombat Games Ranked, Worst to Best. by Michael Andronico Apr 27, 2019,
Best Word Games for iPhone and iPad | iMore
Customization of notification LED works on almost all phones running Android 6.0+ and the great thing about it that it can be done without the requirement of rooting your device. However, some exceptions are there where OEM have restricted third-party apps to take control of the LED and in that case, root access would be required for LED
अपने Nexus 5 पर LED Notification Colors को बिना Rooting के
If you want to use Chrome extensions, and while working in Incognito mode, here's how to make that happen. And, more importantly, why you shouldn't rely on Incognito (and its extensions) to be 100
Common Chrome OS Problems, and How to Fix Them | Digital Trends
If you like to keep your eye on exactly how much battery is left on the Galaxy S7 or S7 Edge, then you can show the battery percentage in the status bar. One of my favorite features that is missing from Google's AOSP Nexus version of Android is the ability to see the battery percentage right in the status bar.
Filmic Pro has a superb suite of professional settings — bit rate, frame rate, and mic choice, to name a few — which can enable you to capture the … Flipboard: How To: Save Custom Shooting Presets in Filmic Pro So You Don't Have to Adjust Settings Later for Similar Shots
Filmic Pro 101 « Smartphones :: Gadget Hacks
Sphero Academy is your personal hub for professional learning courses, resource guides, classroom kits, robot education, one-on-one support, and all the training you need to get Sphero Edu up and rolling. Drive it, program it, and hack it. Our latest and greatest robot, RVR, raised over $1 million
How to Find That Book You've Spent Years Looking For - Utne
0 comments:
Post a Comment