How To: Unlock the Bootloader & Root Your HTC One Running Android 4.4.2 KitKat
As softModders, the first thing we do after updating to the newest version of Android is to root, install a custom recovery, and install a superuser app. By doing this you open up your HTC One to a vast quantity of new apps and tweaks you can use to truly make your phone One of a kind. Please enable JavaScript to watch this video.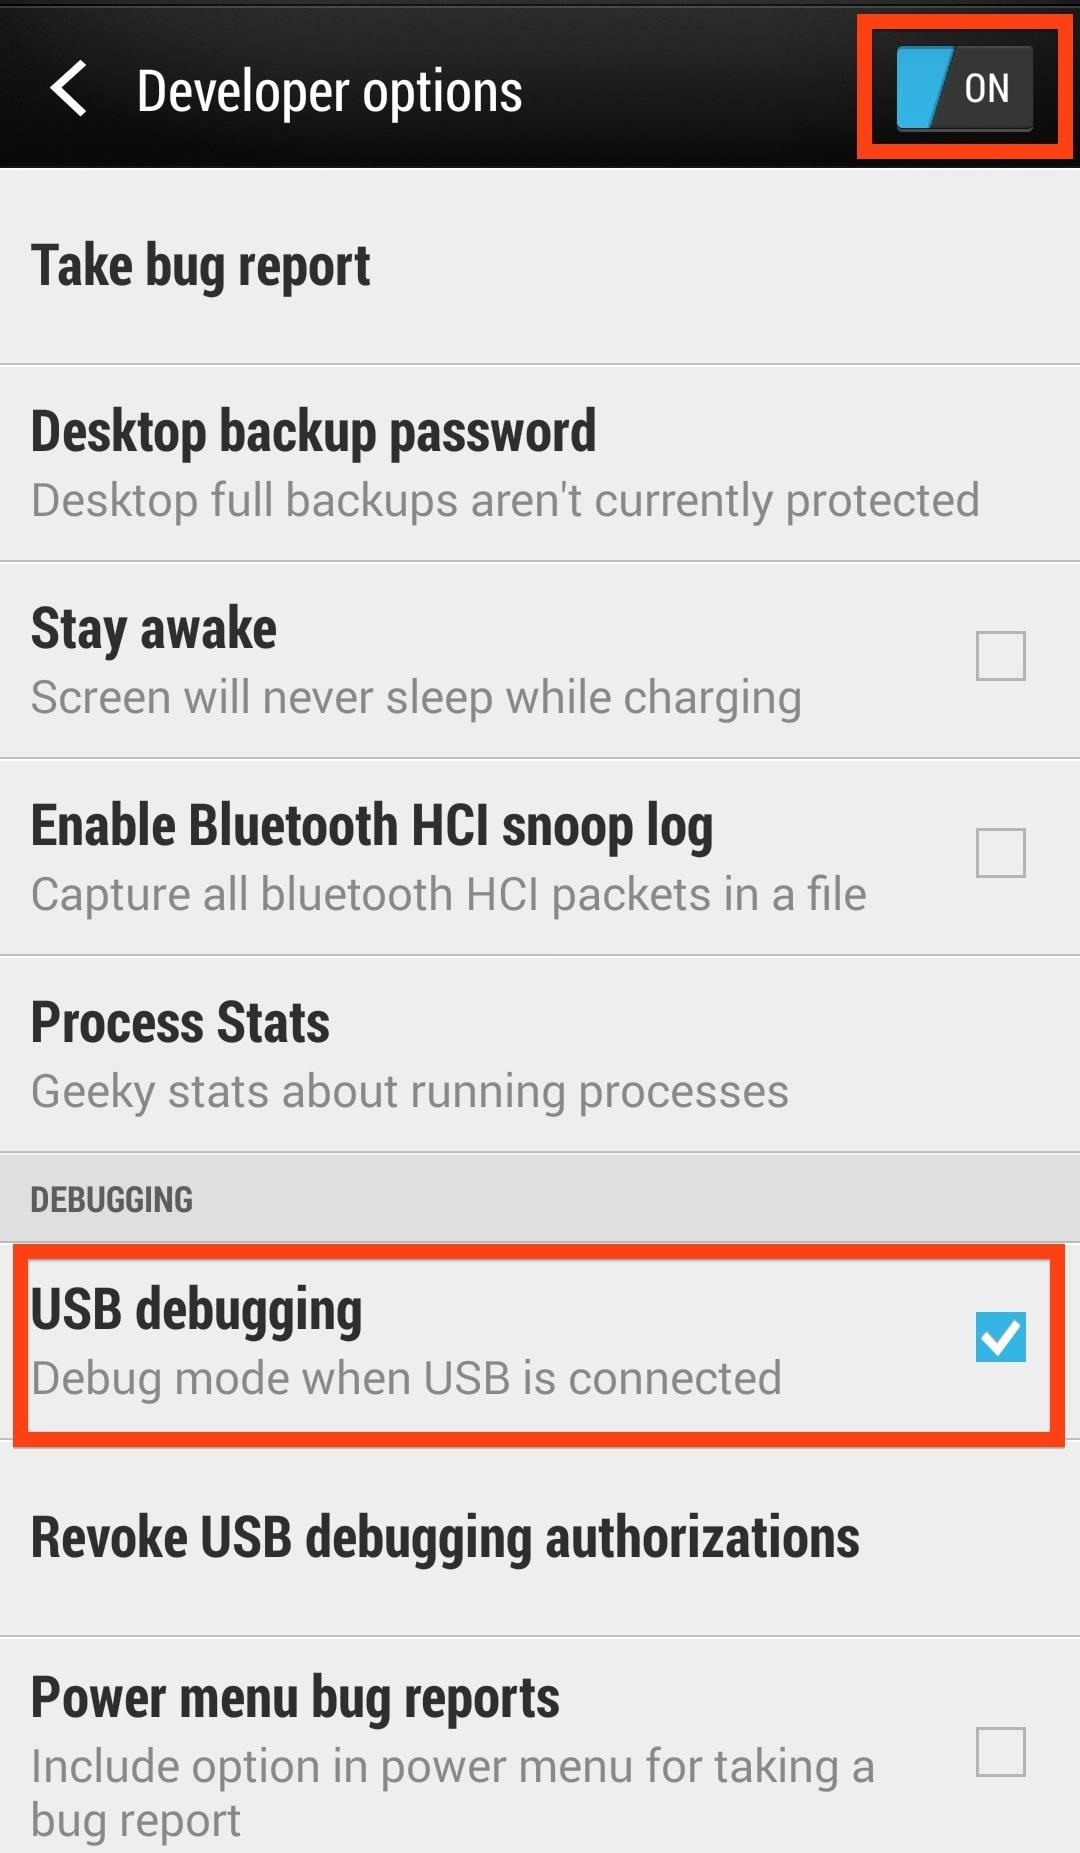
PrerequisitesWe'll need to get a few basic out of the way before we begin.Make sure your phone is fully charged. Register for an account over at HTCdev. Enable USB debugging in Developer options. Disable "Fast boot" in your power settings by going to Settings -> Battery Manager -> uncheck Fast boot. Have ADB and Fastboot installed on your computer. Back up all of your app data using ADB. Also, be sure to back up anything in the internal storage of your device to your Mac because this process wipes all data from your device, including pictures, music, videos, etc. Make sure you have the HTC One drivers installed. If you installed HTC Sync, they are already on your Mac. Unfortunately, Big Red (Verizon) thought it best to remove the ability to unlock your bootloader through HTC Dev. Because of this added security measure, any One running KitKat cannot be unlocked or S-Off'd. If you are one of the lucky few to still be using JellyBean, than you are in luck, as long as you S-Off your device you can unlock your bootloader.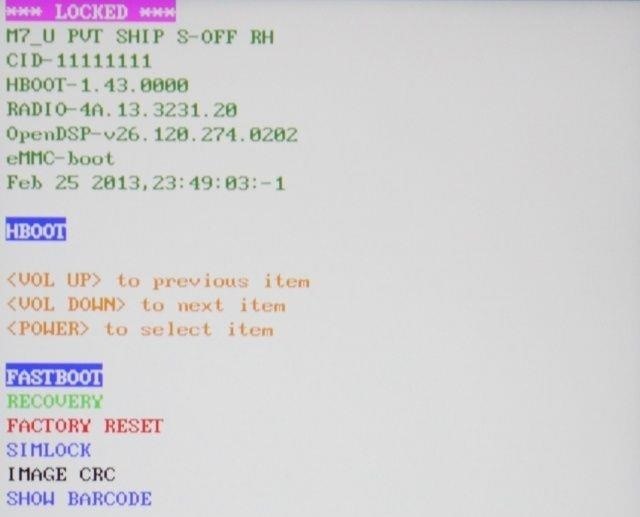
Unlocking Your BootloaderThe first step to rooting is having an unlocked bootloader.Basically, a bootloader is what starts your Android operating system kernel. Every bootloader is device specific, which means there are different ways to unlock them depending on what phone you are using.The beauty of unlocking your bootloader is that you can install custom firmwares, recoveries, and ROMs without the need for HTC to officially push them out.Place your device into fastboot mode by shutting off your phone, then powering it on again by pressing both the Power and Volume down buttons until you see the screen below. Highlight fastboot by using the Volume down button and confirm by pressing the Power button. Connect your phone to your Mac and open Terminal. In terminal, type fastboot oem get_identifier_token. Now copy the identifier code (excluding the '(bootloader)' portion) and hold onto it. Go to HTCDev.com and login to your account. Select Unlock Bootloader and then Get Started. Select All Supported Models and then Begin Unlock Bootloader. Choose Yes, then Proceed to Unlock on the next 2 pop-ups. On the following screen, scroll all the way to bottom and select Proceed to Step 5. Paste in that identifier token into the bottom field of the next screen and click Submit. Go to your email and download the Unlock_code.bin that HTC emailed to you, then place it on your Desktop. Now, back in terminal, type cd Desktop. Then, fastboot flash unlock token Unlock_code.bin. Now go to your phone and, using the Volume Up button, select Yes to unlock bootloader and confirm using your Power button. Wait a few seconds and allow your HTC One to reboot. Congratulations! Your bootloader is now unlocked and your phone is basically back to stock, so you are going to need to go through the set up process as if it were a new device.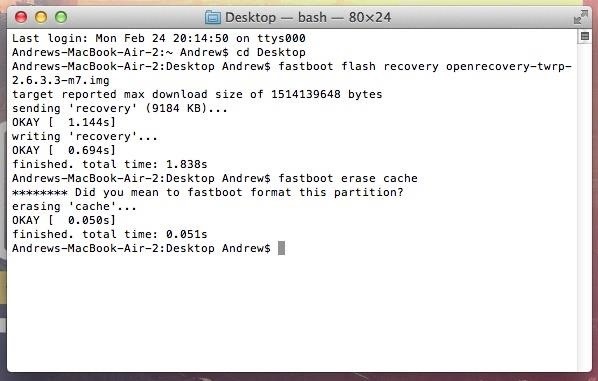
Installing TWRP Recovery & SuperSUNow that the bootloader has been unlocked, it's time to root!Once you are rebooted, go to Chainfire's download page on your Mac and download the UPDATE-SuperSU .zip file (Chainfire will always update the download page to the latest version). Once downloaded, copy it to the internal storage of your phone. Just like we did in Step 1 for unlocking the bootloader, put your phone into fastboot mode. Download the appropriate TWRP recovery .img file. If you have an AT&T, T-Mobile, International, or Developer Edition HTC One, go to this page to download the TWRP recovery.img file. If you have a Sprint HTC One, go to this page to download the TWRP recovery.img file. To install the recovery, type one of the following into Terminal. For the AT&T, T-Mobile, International, and Developer editions, type fastboot flash recovery openrecovery-twrp-2.6.3.3-m7.img. For the Sprint HTC Once, type fastboot flash recovery openrecovery-twrp-2.6.3.0-m7wls.img. Then type fastboot erase cache. Now on your phone, go highlight Bootloader (using the volume keys) and hit the Power button to confirm. Using the volume keys, select Recovery, then hit the Power button again to boot your HTC One into recovery mode. Once in TWRP, select Install, then select the SuperSU zip file you copied over earlier. Slide to install and then select Reboot System. That's it, you're rooted!
Now What?Once rebooted, you will have a SuperSU icon in your app drawer and be able to use it to grant apps root access, like the renowned Xposed Installer.After this is all done, you will be able to restore your data using the same guide you used to back up your data. Just be sure to re-enable USB debugging.
News: Google's Pixel Phone Is Taking All the Fun Out of Android, and That's the Point News: The Best Labor Day 2018 Deals on Smartphones How To: Watch the Google Event on Replay — Pixel 2, Google Home Mini, Pixelbook & More
Google Pixel review: the best Android experience around
How to Get the Classic Volume Controls Back in Windows 10
Are you wondering how to record calls on your iPhone? It isn't as easy as you might think. Here are some free apps and services that can help get the job done, plus a selection of apps that charge
How to Record Phone Calls on an iPhone (with Pictures
How to USB Tether your Samsung Vibrant Galaxy S Phone as a 3G
How to Unlock Samsung Galaxy Siii (S3). Planning on traveling and need to put a local SIM card into your Galaxy 3? Want to change carriers but keep your phone? You may need to unlock your phone in order to use a different SIM card.
5 Relatively Hidden Galaxy S9 Features You Should Know About
News: Here's Everything We Know About That Nasty iPhone 8 Delay Rumor News: Coming Soon to a Smartphone Near You: 3D Navigation for Buildings! News: Xiaomi Might Make Its First Stop on US Shores with the Mi 8 Anniversary Edition News: Apple's Newest Venture Is Unlike Anything It's Done Before
Everything You Need to Know About the iPhone 8 & 8 Plus « iOS
As another example, maybe you simply want to close out your goals for the day to beat your friend in that friendly competition you've been sharing Activity data with (yes, this one really is cheating). Whatever the reason, if you want to close your move, exercise, and stand rings on Apple Watch manually, it can be done and here's how.
How to quickly close your Apple Watch's Move ring | iMore
Gear 360 VR Camera Set to Accompany Galaxy S7; Announcement
Android is known for its customization. Over the years, we have shared with you a bunch of launchers, wallpapers, icons, etc. to help you customize your device in a better way. Today, we will go a step ahead and implement themes on the system level. Substratum, a replacement for previously popular
How to Theme your Android Device With Substratum | Arsiviz
How to create a complete Microsoft experience on Android Forget Windows Phone: With the right set of software, you can turn any Android device into a Microsoft-centric, PC-syncing machine.
Reverse phone lookup has never been more easy. You can now identify an unknown caller using our cutting edge cell phone lookup technology. We search millions of records to find the real person or business associated with a phone number. ZLOOKUP is 100% free and entirely hassle free reverse cell phone lookup - and it actually works!
Reverse Cell Phone Number Lookup | National Cellular Directory
Action center in Windows 10 is where you'll find your notifications and quick actions. Change your settings at any time to adjust how and when you see notifications and which apps and settings are your top quick actions. Select the Start button, then select Settings > System > Notifications & actions. Change notification settings for all senders
How to disable annoying Android notifications
0 comments:
Post a Comment